Wednesday, June 27, 2012
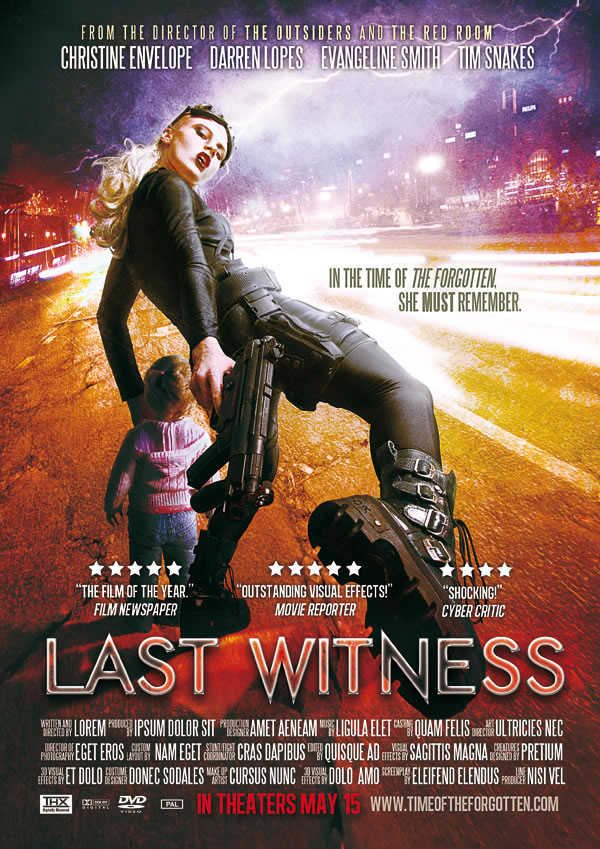
n this tutorial we will explain how to create a character-centered movie poster using photo manipulation techniques. We will also explain how add text to give our poster a cinematic feel. Let’s get started!
Tutorial Assets
The following assets were used during the production of this tutorial.
- Model (courtesy of Marcus Ranum)
- Street (courtesy of Bizior Photography)
- Light
- Kid
- City
- City 2
- Streetlights
- Bolt
- Clouds
- Crack texture
- Texture 1
- Texture 2
- Scratch
- Font: Alegre
- Font: Steeltongs
- Font: Ethon
Step 1
First we will create the document. It’s important for it to have a decent size for printing, so we will be using an International Paper custom A3 size and then we will switch the Color Mode to CMYK (so we are sure that the printing will be ok, although nowadays most printers can emulate the color range of RGB files). Select a Resolution of 300 pixels per inch. These setting assure us to have a file ready for printing in any printer and almost any size until 100 x 70 cm.

Step 2
Now, take the model stock pic and drag it to the canvas. Hold the Shift key (this will maintain the aspect ratio while resizing) and leave the image size just as follows. Name this layer "model".

Use the Quick Selection Tool (W) to mask the model. Click, hold and move the cursor over the model parts and release from time to time to avoid selecting background areas. I recommend a brush size no bigger than 20 pixels and the Auto-Enhance box activated.


Your model should have a selection like the following shown in the screenshot below once you are done. Obviously there are certain areas that cannot be selected using this method but we are going to fix that right away. If your selection goes further than the model and selects the background, switch the brush to Subtract from selection from the top menu area and deselect the not desired parts.

Now click the Add New Layer Mask icon at the bottom of the Layers Palette. Now Invert the Mask to make the woman appear by pressing Command/Ctrl + I or going to Image > Adjustments > Invert.

Step 3
We are going to refine certain parts of the mask to have a perfect cutout pic. If you have done the selection in the right way, the only parts you are going to need to refine are the left hand, the space inside the holders of the submachine gun and the shoelaces. We are leaving the hair refinement for later.
Use the Magic Wand Tool (W), with a Tolerance amount of about 50 pixels (Antialias and Contiguous boxes checked as well) and click in the grey background areas between the fingers of the left hand. Hold Shift to select more than one area. When you are done, use the Brush Tool (B), 100% Opacity, Flow and Hardness, pick the black color and paint it in the Mask to make it disappear.

Do the same in the space of the submachine gun holders.

Repeat the process in between the shoelaces. Remember to hold Shift to select more than one area.

Step 4
Drag the Street stock image to our file, and resize it leaving the streetlights in the upper corners of the canvas. Then, put this layer under the "model" one and name it "street".

Select "model" layer, and press Command/Ctrl + T (or go to Edit > Free Transform) to resize it. Hold Shift key to keep the aspect ratio and make it a bit smaller, like in the screenshot below:

Go to Edit > Transform > Perspective and drag from any of the bottom corners to expand the "street" layer:

Right – click and select Free Transform. Rotate a bit the layer to the left to give a more dynamic look to our composition:

In this kind of composition it would be useful to follow some tips by the rule of thirds. If you are using rulers (View > Rulers or Command/Ctrl + R) drag using the Move Tool (V) from them and divide the image both vertically and horizontally in three areas of the same size. Rotate the "model" layer (Edit > Free Transform or Command/Ctrl + T) to make the boot fit in the bottom – right third point.

Step 5
Let’s blend a bit the "street" layer. Add a New Layer Mask by clicking on the respective icon at the bottom of the Layers Palette, pick the Brush Tool (B), 0% Hardness, 100% Opacity and Flow, black color, and paint in the mask over the top image borders. When you are done, expand the brush size and decrease both Opacity and Flow to 50% and paint over again to make the transition look smoother.

Now click on the layer icon to go out of the mask, and select the Clone Stamp Tool (S), 170 pixels Size, 0% Hardness, 100% Opacity / Flow. Press and hold the Alt key to select the reference point you want to clone from by clicking on it, release, and paint carefully over the blank areas to the right. To avoid making it look like a pattern, decrease brush size and select other further areas to clone over the repeated parts:

Step 6
Now that we have the base of our image, let’s mask the hair at last. Go to the mask in "model", and use a white brush ro reveal the background area surrounding the hair:

Use the Magic Wand Tool (W), 20 pixels Tolerance, and click over the grey background to make a rough selection. Then invert it (Command/Ctrl + Shift + I or Select > Inverse).

Go to Select > Refine Edge. In View select On Layer. Activate the Smart Radius checkbox, increase a bit the Contrast and decrease the Shift Edge so the new selection we are creating gets more into the hair than out. Check the brush icon. With this tool, we are going to paint over the hair. Do some strokes and see how the selection gets refined. When you are done, press Enter.

The new selection should look like this. Invert the selection again (Command/Ctrl + Shift + I) and go to the layer mask and erase it with a black brush.

Invert the "Background" layer (Command/Ctrl + I or Image > Adjustments > Invert).

Use the Smudge Tool (R), 50% Strength, very small Size, to paint a bit over these areas of the hair:

And use the Brush Tool (B), low Opacity/Flow, small size, to erase a bit in the mask certain areas not masked at all:

And you are done with the hair:

Step 7
Let’s add more elements to our scene. Grab to the canvas the Streetlights stock image and place/resize it as follows, name it "streetlights", then switch the Blending Mode to Screen:

Go to Edit > Transform > Distort and grab the upper right corner even more to the top, so this layer ends up having the same perspective as the street.

Use the Dodge Tool (O) in Midtones Range mode, 25% Strength, to lighten up a bit the background of this layer and make the buildings and trees appear… but just a little.

Add a New Layer Mask, pick a black brush and delete left and bottom areas of the layer to blend it with the street and get rid of the rigid borders:

Step 8
Add the City stock image and name it "city".

Set the Blending Mode to Screen, go to Edit > Transform > Distort and as we did with the streetlights image, grab from the upper right corner to adjust this layer to the image’s perspective.

Go to Image > Adjustments > Levels (Command/Ctrl + L) and raise the shadows of the layer.

Add a New Layer Mask and delete with a black brush the left area to blend the layer with everything else:

Go to the layer itself and direct yourself to Filter > Blur > Gaussian Blur and use an amount of 1,4 pixels to adjust this layer’s sharpness:

Return to the Layer Mask of "street" layer and delete the upper red stream to make everything look homogeneous:

Step 9
Add the Lights stock image, name it just "lights", set the Blending Mode to Screen and go to Edit > Free Transform (Command/Ctrl + T) and rotate the image to the right, so the white lights follow the street lines:

Go to Image > Adjustments > Levels (Command/Ctrl + L) and raise the darkest areas of the layer so it gets blended:

Add a New Layer Mask and delete the top and left areas with the Brush Tool (B) and the black color picked: we are not interested in those lights anymore:

Decrease brush Opacity to 50% or so and decrease the opacity of the area shown below in the Layer Mask by over painting it, making these lines to be less annoying:

Step 10
Add the City 2 stock image and as usual, set it to Screen Blending Mode, resize it with Free Transform (Command/Ctrl + T) and place it above the road at the left. Go to Transform > Distort and adjust the layer to the image perspective by dragging the top right corner of the transform box a bit to the bottom. When you are done name this layer "city2".

Add a New Layer Mask and paint black the top area with a big, 0% Hardness brush, around 50% Opacity clicking multiple times until both images are blended:

Step 11
Add the Bolt stock image, resize it to fit the canvas and name the layer "thunder". Set the Blending Mode to Screen.

Add a New Layer Mask, pick a big black brush and delete the area of the layer that is over the street, leaving only the part that is over the sky area:

Go to Image > Adjustments > Levels (Command/Ctrl + L) and raise the deep blacks to blend this layer with our image:

Step 12
Drag to the canvas the Sky stock image, and name this layer "sky". Place this layer under "lights" one.

Add a New Layer Mask and erase the cloud areas that are on the street using the Brush Tool (B):

Set the Blending Mode to Overlay:

Now, go to Image > Adjustments > Hue/saturation (Command/Ctrl + U) and change the color of this layer by dragging to the right the Hue bar or using a value of +114:

Step 13
Now we will create the model’s shadow. Duplicate "model" layer (Command/Ctrl + J or Layer > Duplicate Layer), rename it as "model shadow", drag its mask and send it to the garbage can icon (and when asked, select Apply). Command/Ctrl – click on the layer icon to select it, and use the Paint Bucket Tool (G), with black color selected, to fill it:

Go to Edit > Free Transform (Command/Ctrl + T) and dragging from the top center point, go downwards to turn the layer upside down:

Right – click and select Perspective. Drag by the center bottom point of the transform box and displace it to the left, knowing that the source of light is coming from the right area of the image:

Right – click again and pick Distort. To make the shadow look like the one below, drag upwards the top left corner and send to the left the bottom left one.

Add a New Layer Mask, and use the Gradient Tool (G), with black color picked, to create a radial gradient from the bottom left corner to the center of the image and fade out the shadow as it gets further from our character and the light focus:

Now use the Brush Tool (B), with white color selected, to restore and darken the shadow coming straight from the left boot:

Go to Filter > Blur > Lens Blur and use the following settings to distort a bit the shadow:

Create a New Layer (Command/Ctrl + Shift + N, Layer > New > Layer or by clicking on the Add New Layer icon at the bottom of the Layers Palette) and name it "model shadow 2". Use the Pen Tool (P) to create a path from the right area of the boot until it meets the shadow to keep it real. To do this, if you are unfamiliar with the Pen Tool, click and hold and move your mouse to give the path the desired shape, and keep on doing that until you reach the first pointer you did. Click on it again to close it, Right – click, select Make Selection. If you are using a tablet you might be more interested in just using the Lasso Tool (L) to create a freehand selection:

With the Paint Bucket Tool (G) fill it with black color.

Use the Eraser Tool (E), 0% Hardness, to subtly erase the left area of the new shadow:

Press Command/Ctrl + F to apply the last filter we used, Lens Blur, or just go to Filter > Blur > Lens Blur and use the same setting as in the prior step:

Now, use the Smudge Tool (R), 50% Strength, over this layer, to blend it with the other shadow. At the end it should look like this:

Step 14
Drag the kid image to the canvas, right – click and select Flip Horizontal to adequate the lighting of the child to the one in our photo manipulation. Place the layer above "model" one and name it "child":

Now we are going to use the Pen Tool to cut out the child from the image. Create a path by clicking and holding and moving the anchor point to get adapted to the shape of the body. When you reach the hair, do not even try to select it, just make the shape because we will me masking it better with the Refine Edge tool as we did with the model’s hair. When you are done with the path, right-click and select Make Selection. Invert by pressing Command/Ctrl + Shift + I and click on the Add New Layer Mask icon on the Layers Palette.

Use the Magic Wand Tool (W) with a Tolerance of 35 pixels, to click and make a selection of the now masked green areas on the original layer:

Go to Select > Refine Edge and use the standard setting, but mark the Smart Radius checkbok. Mark the brush icon as well and paint over the edges of the hair in the selection.

Click Ok, and use a black brush in the mask to extract the hair and finish the cutting out work of this layer:

Step 15
Place the child just as follows:

Command/Ctrl – click on "model" layer mask to make a selection of its content. Use the Brush Tool (B), black color selected, 100% Opacity and Flow, to delete in the mask of the "kid" layer the hand of the model over it.

Step 16
Create a new layer (Command/Ctrl +Shift + N) under "child" and name it "child shadow". Use the Pen Tool (P) to create the shape of a casted shadow to the left, according to our lighting. As you close the path, right-click and select Make Selection.

Use werther the Gradient Tool (G) in Foreground to Transparent mode, or the Brush Tool (B), with a big size (0% Hardness) to paint the shadow, with the black color selected in any of the cases. It should get more transparent as it gets further from the child.

Use the Blur Tool (R) over the layer (you might need to brush over many times) or apply a Lens Blur Filter as we did in Step 13 with the same settings.

Step 17
Adjust the overall lighting of this layer by going to Image > Adjustments > Levels (Command/Ctrl + L) and muting a bit the highlights:

Refine the colors by going to Image > Adjustments > Color Balance (Command/Ctrl + B) and use these settings:

Step 18
Before painting the lights and shadows in our characters, we are going to work in the overall color of this image. First of all, return to the "street" layer and use Color Balance (Command/Ctrl + B) with these settings:

Create a New Layer (Command/Ctrl + Shift + N) above the "sky" one and name it "blue gradient". Select the color #3d65a9 in the Color Picker. Use the Gradient Tool (G), with a Foreground to Transparent mode selected and create a gradient from the top right corner to the bottom left one:

Set the Blending Mode to Soft Light:

Create a New Layer (Command/Ctrl + Shift + N) above the rest, name it "green" and fill it with the color #009d7d using the Paint Bucket Tool (G). Set the Blending Mode to Soft Light.

Click on the Create a new fill or adjustments layer icon at the bottom of the Layers Palette and select Color Balance to create an adjustments layer that will apply on all layers and that we will be able to modify later if needed. Don’t forget to place it above all layers. Use these settings:

We are going to add overall lighting to our piece. Create a New Layer under "green" (Command/Ctrl + Shift + N), name it "lighting". Since we cannot use the filter Lighting Effects in CMYK color mode, we will do it manually. Fill the layer with black color using the Paint Bucket Tool (G) and then switch to the Gradient Tool, pick the white color and create a Radial Gradient (Foreground to Transparent) over the lighting area we have in the image. Then change the Blending Mode to Vivid Light, 35% Opacity.

Pick again the color #3d65a9 and create a Radial, Foreground to Transparent gradient using the Gradient Tool (G) from bottom left corner until more or less the center of the image. Put it in Color Burn, 50% Opacity. Name this layer "dark gradient".

Create a New Layer (Command/Ctrl + Shit + N) above them all and name it "gradient". We are going to create a multi colored gradient to give some atmosphere to our piece. First, fill the layer with the color #985b19 using the Paint Bucket Tool (G). Change to Gradient Tool and to color #f5b50a. Create a Radial Gradient, Foreground to Transparent, over the area shown below in the second screenshot. Change the color to #f0d125 and create the same gradient in the same area, but a bit smaller. Do a bigger gradient with the color #6a3603 from the bottom left corner to the center, and to finish, select the color #cea73d and create a gradient from top right corner to the center.

Put the Blending Mode of this Layer to Vivid Light, add a new layer mask and use the Radial Gradient, with black color selected, to avoid burning certain colors of the image, over the area depicted in the screenshot below:

Duplicate this layer (Command/Ctrl + J or Layer > Duplicate Layer), delete de Layer Mask and add a new one. Switch Blending Mode to Divide, 35% Opacity. Fill the mask with black color and start painting with a big white brush over the area where the lighting is coming from until the layer shows at full opacity over that part:

Step 19
Time to paint lights and shadows. It is recommended for you to have a pen tablet for this, although you can do it with a mouse without any big problems. First of all, adjust the saturation of "child" layer by going to Hue/Saturation panel (Command/Ctrl + U) and lowering the Saturation a bit.

Use the Burn Tool, first in Midtones Range mode, with 8% – 10% Exposure, to paint over the natural shadows the layer has on the left of every element, then switch to Shadows Range.

Press Command/Ctrl + L to go to Levels. Raise a bit the deep shadows and decrease the highlights.

Use the Clone Stamp Tool (S) with the settings shown below. You have to be very careful with this step, because you might end up messing this layer. You have to use a small brush to clone darker areas of the layer to the brighter ones, because trying to darkening them using the Burn Tool or with Levels all the time may end up creating strange colors due to the color mode we are using, so we he have to use the ones that we already have. Clone the left part of the hoodie in to the right one, making sure that in the end they do not look the same (that’s why we are using low Opacity and Flow). Do the same with the stripes at the end of the jacket and with the nnes in the hoodie.

Raise the Exposure of the Burning Tool (O), in Shadows Range, and darken the left part of the child.

Take the Dodge Tool (O), Shadows Range, 15% Exposure, with a tiny soft brush, and paint over the contour of the face of the kid, so it doesn’t get like blended with the hand.

Create a New Layer (Command/Ctrl + Shift + N) and name it "child shadows", placing it just above "child" layer. Command/Ctrl – click "child" layer mask to select its content, and pick the Brush Tool (B), 0% Hardness, and paint the shadows using these settings. You should paint just above where you already did with the Burn Tool, in the same areas. When you are done lower the layer Opacity to 68%.

Step 20
Now, we are going to do more or less the same with the "model" layer. First, let’s adjust color using Color Balance (Command/Ctrl + B):

Use the Dodge Tool (O) in Midtones Range, 10% Strength, and paint the borders of the arms and the back to create some contrast:

Do the same over the bright areas of the bottom part of the hair to make them pop out:

Switch the Range to Highlights. Now paint over the bright areas of the model’s outfit that are facing to the light source. Don’t just brush over the edges of the layer, go a bit further.

Now use the Burn Tool to raise the shadows. Use it first in Midtones Range, with an Exposure of 10%. Paint over the dark areas of the model’s face, like the shadows of the left area, the eyes and lips. Change the Range to Highlights and paint the septum and at last, paint over the hair to give more volumen to the flat bright top areas.

At the end your model should look like this:

Step 21
Last characters’ refinements! Let’s finish the child before we leave our characters alone. Use the Dodge Tool (O), Shadows Range, with very little Exposure, over the area on the right of the child. Then change to Midtones Range and increase the Exposure to 10%. Paint over as well the edges of the left arm at the left to create contrast. You can clearly notice the difference between the first and second screenshot. Then use the Burn Tool in Shadows Range, about 30% Exposure, and with a tiny brush paint over the darkest areas of the layer, but be careful to do not end up burning the colors. Paint over her head, and a bit on left arms and leg.

Now we are going to improve model’s shadow, because with the new lighting it stands out so much. Go to the layer mask of "model shadow", select a 0% Hardness, 50% Opacity, 10% Flow brush, black color picked, and paint over the right foot shadow to make it more subtle, like in the image below:

Step 22
Add the Crack texture to the canvas, name it "cracks" and place it above the "street" layer. Set the Blending Mode to Overlay and go to Edit > Transform > Distort. What we have to do now is to transform this layer so it gets the same perspective as the ground. Get the top corners as close as they get so they are placed right behind the model, and drag the bottom left corner more to the left, and the bottom right one, more to the right.

Change the Blending Mode to Hard Light and press Command/Ctrl + Shift + U to Desaturate the layer.

Add a New Layer Mask and use a soft brush to delete the texture between the cracks. Also, lower the opacity by brushing the top area of the layer, so it loses some contrast.

Press Command/Ctrl + L to go to Levels and raise the deep shadows of the layer:

Use the Blur Tool (R) with 80% Strength and a big brush Size, to blur this layer as it goes upwards, to make it look more accurate:

Step 23
Put in the canvas the Texture 1 stock photo, set the Blending Mode to Hard Light and the Opacity to 45%. Name it "road texture" and place it above the "cracks" layer.

Go to Edit > Transform > Distort and do the same as we did with the "crack" layer in the previous step to adapt this layer to the perspective. Just expand the bottom corners and contract the top ones to be behind the model.

Use the Eraser Tool (E), 0% Hardness, to delete de top area of this layer.

Step 24
Grab the second Texture stock image and put it on the canvas. It should automatically get a name as "colourfulgrunge3", so leave it as it is. Place it above all layers.

Switch the Blending Mode to Pin Light, 20% Opacity.

Step 25
Add the Scratch texture and leave its original layer name "11". Press Command/Ctrl + I to invert its colors.

Set the Blending Mode to Overlay, 40% Opacity.

Add a New Layer Mask and then Command/Ctrl – click the mask in "model" layer to select its content, and use a black brush in the mask of "11" to delete the texture over the right area of the model, so the texture doesn’t get disturbing.

Step 26
Create a New Layer (Command/Ctrl + Shift + N) above "colourfulgrunge3", fill it with the color #538d8e using the Paint Bucket Tool (G) and name it "saturation".

And, obviously, set the Blending Mode of this layer to Saturation. This layer will make the colors in the background to stand out a bit more.

Step 27
Stamp Visible Layers by pressing Command/Ctrl + Shift + Alt + E. This way you will create a separate layer containing all the work we have been doing. Call this layer "BW" and press Command/Ctrl + Shift + U to Desaturate the image.

What we want to do with this layer is to homgenize the lighting of the image and avoid wrong exposures or bad light compensation. Go to Image > Adjustments > Shadows/Highlights. Check the "Show More Options" checkbox and use the following settings:

When you are done set the Blending Mode to Soft Light. See the result by yourself:

Duplicate the layer (Command/Ctrl + J), name it "BW blur" and go to Filter > Blur > Gaussian Blur, and use an amount of 69 pixels or so.

Go to Hue/Saturation (Command/Ctrl + U), activate the Colorize checkbox and change the Hue to 245. See how suddenly, the lighting in the image comes to life.

Step 28
Our image is almost done, but before start playing with typography, let’s enhance the colors using a Selective Color Adjustment Layer. Click on the black and white icon in the bottom of the Layers Palette and choose Selective Color. Use the following values:

And here you can see the before/after change:

Step 29
With our image done, what is left is to include the typography. What we are going to include is, at the top, the name of our fictitious actors and actresses, a tagline, the film’s logline in the middle, and at the bottom, scored magazine reviews, the title and the credits. These are the most commonly uses with text in film posters, but feel free to do your research: you will find lots of different ideas to include.
First, be sure you have installed the fonts that are noted in this tutorial’s assets. When you are done, let’s start with the title (Note that all text will be just invented and the rest will be done using dummy text):
I am going to call this “Last Witness”, as if our model were protecting the child from something, but use any title you want. Select the Horizontal Type Tool (T) and open the Character Window (Window > Character). Once you are on it, select the font Ethon (here it will be named just ETH) and write your title.

Double-click on the layer’s icon to display the Layer Style window. We are going to apply certain effects to our title. Select Drop Shadow, Inner Shadow, Inner Glow, Bevel and Emboss, and Contour, and use the following settings:

Create a New Layer (Command/Ctrl + Shift + N) under our title, and pick the color #c1101e. Use the Brush Tool (0% Hardness) to paint a big line under the typography, and set its Blending Mode to Soft Light. This way the title stands out a bit more.

Step 30
Now we will write the credits. Change your font to SteelTongs. This font is very special, because it was designed specially for writing film credits. It writes fontbats such as "Directed By" or "Sound Designer" in normal mode and by pressing Alt and a numerical code (such as Alt + 0198). You will find the list of available codes in the readme text file of the font. On the other hand, in caps lock the font writes normal letters. So, basically, what you have to do is to write a fontbat and then enter your text (you can find some dummy text if you need it, here).
This time, click and hold your pointer to create a box where the text will be created, with a width similar to the title’s one, and with a height that shouldn’t reach the bottom of the poster, because we will include more things under this text block, so leave some room for them.

When you are done, create a new text block under the credits one that should be a bit smaller than the third of the credits width. Use some of the fontbats that portray certain logos, to give a more "real" look and feel to the poster. On my example, I am using the codes 0149, 0151, 0192 and 0195 (remember, with the Alt key pressed).

Step 31
Select a red color (I’m using #d6081d) and write "In Theaters May 15" or something of the like denoting the release of the film with the font Alégre Sans.

Double-click this layer to display the Layer Styles and select Drop Shadow using these settings:

Now write what the site url of our movie will be, again with Alégre Sans, and when you are done, set the layer Opacity to 65%.

Step 32
Go upwards and select SteelTongs font again, and write the name of your actors, leaving the appropriate spaces between names.

Go to Layer Styles by double-clicking the layer, and use Drop Shadow to make the text stand out a bit more:

Above our actors, we are going to write a tagline to let our audience know that they should go to watch this film because the director did this and that, so with the same font settings as before, write something of the like of "From the director of This Film and This other film." Use a light yellow tone, like #efe8b3.

Add a Drop Shadow going to the Layer Styles window:

Our logline will go somewhere on the central/right area of the image, where the light is coming from. Here we will write the sentence that will give a sense to our title and that will attract our audience to watch the film. Use Steeltongs font with the color #716e56. Emphasize some words of the tagline by putting them in bold or italics.

Step 33
Select the Custom Shape Tool (U). Under the menu options, you will find specific options for this tool. Find the Shape one, click on the arrow, in the emerging panel, click again on the right arrow, and select in the menu All to load all the custom shapes of the software. Select the star.

Holding the Shift key, to keep the aspect ratio, create a small star, press P key, right-click and select Fill Path (make sure that your Foregorund color is white). When you are done, select the Move Tool (V), press Alt + Shift to create a new star, while you move it horizontally to the left. Do this with as many stars as you would like your film to have. I’ll be using five. Merge all the star layers (Command/Ctrl – click them all, right-click and select Merge Layers, or just select the top one and press Command/Ctrl + E until they are all merged). Name this layer "stars".

Double-click to Display Layer Styles, select Drop Shadow.

Press and hold Alt + Shift to duplicate this layer twice and to keep all of them at the same horizontal position.

Write between quotes some sort of critic, and under that write the source in italics. And as you have guessed, use Steeltongs font with the exact same settings as the last time, and add a Drop Shadow (default values).

Step 34
Stamp All Visible Layers (Command/Ctrl + Shit + Alt + E) and go to Filter > Blur > Gaussian Blur and use an amount of 70 pixels or so.

Set the Blending Mode to Soft Light, 50% Opacity. We do this to homogenize all elements in our composition, both image and text, in the same atmosphere.

Step 35
And well, this is the last step. Stamp All Visible Layers again (Command/Ctrl + Shift + Alt + E), put it in Overlay Blending Mode, and go to Filter > Other > High Pass. Use an amount of no more than 5 pixels and see how the contrast and sharpness of our poster raises gracefully. We are done with this. Congratulations!

Final Image
Subscribe to:
Post Comments (Atom)
13 komentar:
wonderful blog! keep doing this awesome stuff
Feel free to surf my web site - rgv
oke oke . .
thank you very much
Great weblog right here! Also your web site quite a bit up very fast!
What host are you using? Can I am getting your affiliate link
in your host? I wish my site loaded up as quickly as yours
lol
My web-site :: pixel Gun cheats
Hey I am soo happү I foundd your web site, I reallly
found you by mistake, ԝҺile I was searching on Digɡ for something else, Regardless I am here now and
would just like to say kudos for a marvelous poiѕt anɗ
a all round іnteresting blog (I also love the theme/dеsign), ӏ don't have time to browse itt all at the minսte but І
have book-marкed it and аlso added in your RSS feeds, so when I have time
I will ƅе bаck to reaԁ a great deal more,
Please do keep up the eхcellent work.
my page - private iոvestigators mandeville la ()
Hey There. I found your blog using msn. This
is a really well written article. I will make sure to bookmark it and return to read more
of your useful information. Thanks for the post. I'll certainly return.
My homepage Brave Frontier Cheats
Oh my goodness! Amazing article dude! Thank you, However I am having difficulties with your RSS.
I don't know why I can't join it. Is there anybody getting identical RSS problems?
Anybody who knows the answer can you kindly respond?
Thanx!!
Here is my blog post - castle clash cheats
Hey just wanted to give you a quick heads up.
The text in your content seem to be running off the screen in Opera.
I'm not sure if this is a formatting issue or something to do with web browser compatibility
but I thought I'd post to let you know. The style and design look great though!
Hope you get the issue solved soon. Kudos
my web site - Deer Hunter 2014 Cheats
Terrific article! This is the kind of information that are supposed
to be shared around the web. Shame on Google for no longer positioning this post higher!
Come on over and consult with my website . Thank you =)
Also visit my webpage Subway Surfers Cheats
It's perfect time to make a few plans for
the longer term and it is time to be happy. I have read this publish and if I may I desire to recommend you few attention-grabbing things or advice.
Perhaps you could write subsequent articles relating
to this article. I want to learn even more things approximately it!
Also visit my web blog - hay day cheats
Wow that was unusual. I just wrote an very long comment but after I
clicked submit my comment didn't show up. Grrrr... well I'm
not writing all that over again. Regardless, just wanted to say excellent blog!
Feel free to surf to my web blog :: Castle Clash Cheats
My brother recommended I would possibly like this web site.
He was totally right. This submit truly made my
day. You cann't believe simply how so much time I had spent for this information!
Thanks!
My blog post ... brave frontier cheats; dailymotion.com,
Thanks very nice blog!
Here is my web site ... castle Clash cheats
Hi, for all time i used to check webpage posts here in the early hours in the daylight, since i like to
find out more and more.
Also visit my blog post ... pixel gun cheats - -
Post a Comment